


Combine two powerful tools -- SEO Quake and Excel -- to perform an index audit, identifying missing pages.
How Many Indexed Web Pages Do You Have Today?
Up to a point, the number of indexed pages shows how well you have been managing an SEO campaign so far.
When you start working on SEO creating additional pages or reviewing the existing content sounds is something normal. As a result, the more pages indexed, the better.
Why Should I Care About These "Invisible" Pages?
If a page is not indexed links and content you have on that page will "not count"; wasted opportunity.
In this post, I won't show you how to fix issues, but rather how to identify them. In the process I will show you a quick but effective way to combine the power of some of the SEO tools around the net with Excel (but you can either use Google Docs or Open office).
Step 1: Identify Your Web Site's Pages
I assume that your sitemap (the XML version) is up to date.
If you don't have it yet, you can create one using a sitemap generator; if your site has less than 500 pages, the majority of online sitemap tool should fit well and can scan the site for free.
If this is not the case, you should probably go for a paid solution, unless you won't accept the risk to have an incomplete analysis. Alternatively you can use a site scraper like "Screaming Frog".
As soon as you have the XML sitemap, open Microsoft Excel. If you use Windows, you will be slightly at an advantage here, as Excel 2010 offers a nice feature to import and recognize XML files easily.
Regrettably, this is not the case for Office for Mac, which seems to have been not provided with such a filter. However, you can still import the file as a text. This will require a little extra effort to select only the <loc> nodes, which can be eventually filtered using the "data filter", or you can use an advanced text editor that supports the Regular Expression to remove all the unwanted text in one go.
In the example below, you can see how the XML file was once imported as a text file in my Mac.

And how it appears once the filter has applied.


You can easily remove the extra bits with the Find & Replace function, then copy the content of the column C (in this case) and pasting into a new spread sheet, which you would probably require if you'd like to keep your stuff in order from minute one.
Add a column header by inserting a row, and name it "Sitemap", just to remember what the data source was.
Step 2: Check How Many Web Pages Search Engines Have Indexed
Get a browser plugin called "SEO Quake", available for most browsers.
Assuming you will start with Google, first thing is to switch off Google Instant and increase the number of results to return up to 100.

Now it's the time to find the indexed pages of your web site. Run the following query
Site:www.yoursite.com
And at the time the results will be shown, if not automatically included, add the following parameter &pws=0 at the end so to get a sort of "impersonalized" result; conditional is mandatory here because according on the browser you are using, it's likely to get different SERP in any case.

It's now time to extract all the information, so press the "View as CSV" button to get an online form with the raw data.


You can either save this information to a plain text file (just in case you need them again later) to import as usual selecting the semi column as a delimiter, or copy and paste straight into Excel.
In the latter case, the next step is to use the "text to column" feature. Again, use the semi column as the text delimiter, and here you go:


Of course, you end up with a lot of extra information, which you definitely don't need for this index audit, so feel free to remove all the unnecessary columns.
Finally, copy and paste the column with the URLs into the new document created before, and paste in the column B, adding at the beginning of the document a column header, naming it with the engine from which the information was retrieved (Google in this case).
Repeat the same process for Bing and any other search engine you may want to include in your audit.
Step 3: Perform The Audit
At this stage you now have all the information into a spreadsheet similar to the one below, so you can carry on with the final audit.


We can immediately get a sense that something is missing, but we don't know exactly what. As you can imagine, with a small data set the problem barely exists but with a big data set of 1000 pages it's harder to identify the gaps. That's why the audit.
The rest of the audit is just a matter of using the Excel VLOOKUP feature.
To make everything easier, we can transform the spread sheet data into a "table". This way, once the first cell is filled in with the formula we require,Excel automatically replicates it across the rest of the table, making it easier to update the document.
This is very useful, especially for big data sets, and it will avoid you dragging down the mouse to the bottom or copy and paste the same formula a lot of times.
Because the first row contained the header, by transforming the data into a table, this will automatically get converted for you, leaving the data to be analyzed available from row 2 onward. It also makes it a lot easier to use the VLOOKUP, as you can refer to the column content by just typing the table header's name rather than the relative cell reference (e.g. A:A).
So, instead of having a formula like
=VLOOKUP(B1, A:A, 1, FALSE)
You will end up by having something like
=VLOOKUP([@Google], [@Sitemap], 1, FALSE)
Which is not meaningless like the first one.
The results this formula gives read unintuitive; you will have the entry repeated wherever the conditions match and an #N/A where they don't.
So what can we do? Let's tweak the formula above so to get result that may act as a "visual indicator" and help you understand the situation in few seconds.
Change the formula to:
=IFERROR(IF(VLOOKUP([@Google], [@Sitemap], 1, FALSE) <> "", TRUE), FALSE)
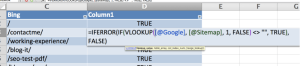

With this double error check, we get a TRUE value when the value matches, and FALSE when it doesn't. Now a quick glance will show you what requires your attention.
For the last bit, just change the column header and off you go. Save your spreadsheet for a later use.
To check for a missing redirect, work on the other way round; assume that your Search Engine results are correct and your sitemap's aren't.
In this way, by swapping the table array with your column containing the results from the SE, you will identify results that have been indexed by SEs and those that are not available on your site (as we all know that redirected pages are not indexed, don't we?). Again, we have to assume your sitemap is 100% accurate.
Please note that this really simple audit doesn't perform any live check; if you have recently fixed a redirect, it may be possible to get a false positive.
Takeaways
Hopefully, by the end of this article you
- Know what an index audit is
- Know how to carry a simple but powerful audit using day to day software
- Have expanded your Excel knowledge
I look forward to hearing any comments from you.
See also: